Showing posts with label Black Powder. Show all posts

Monday, June 20, 2022

Early French Artillery and First Infantry Unit based


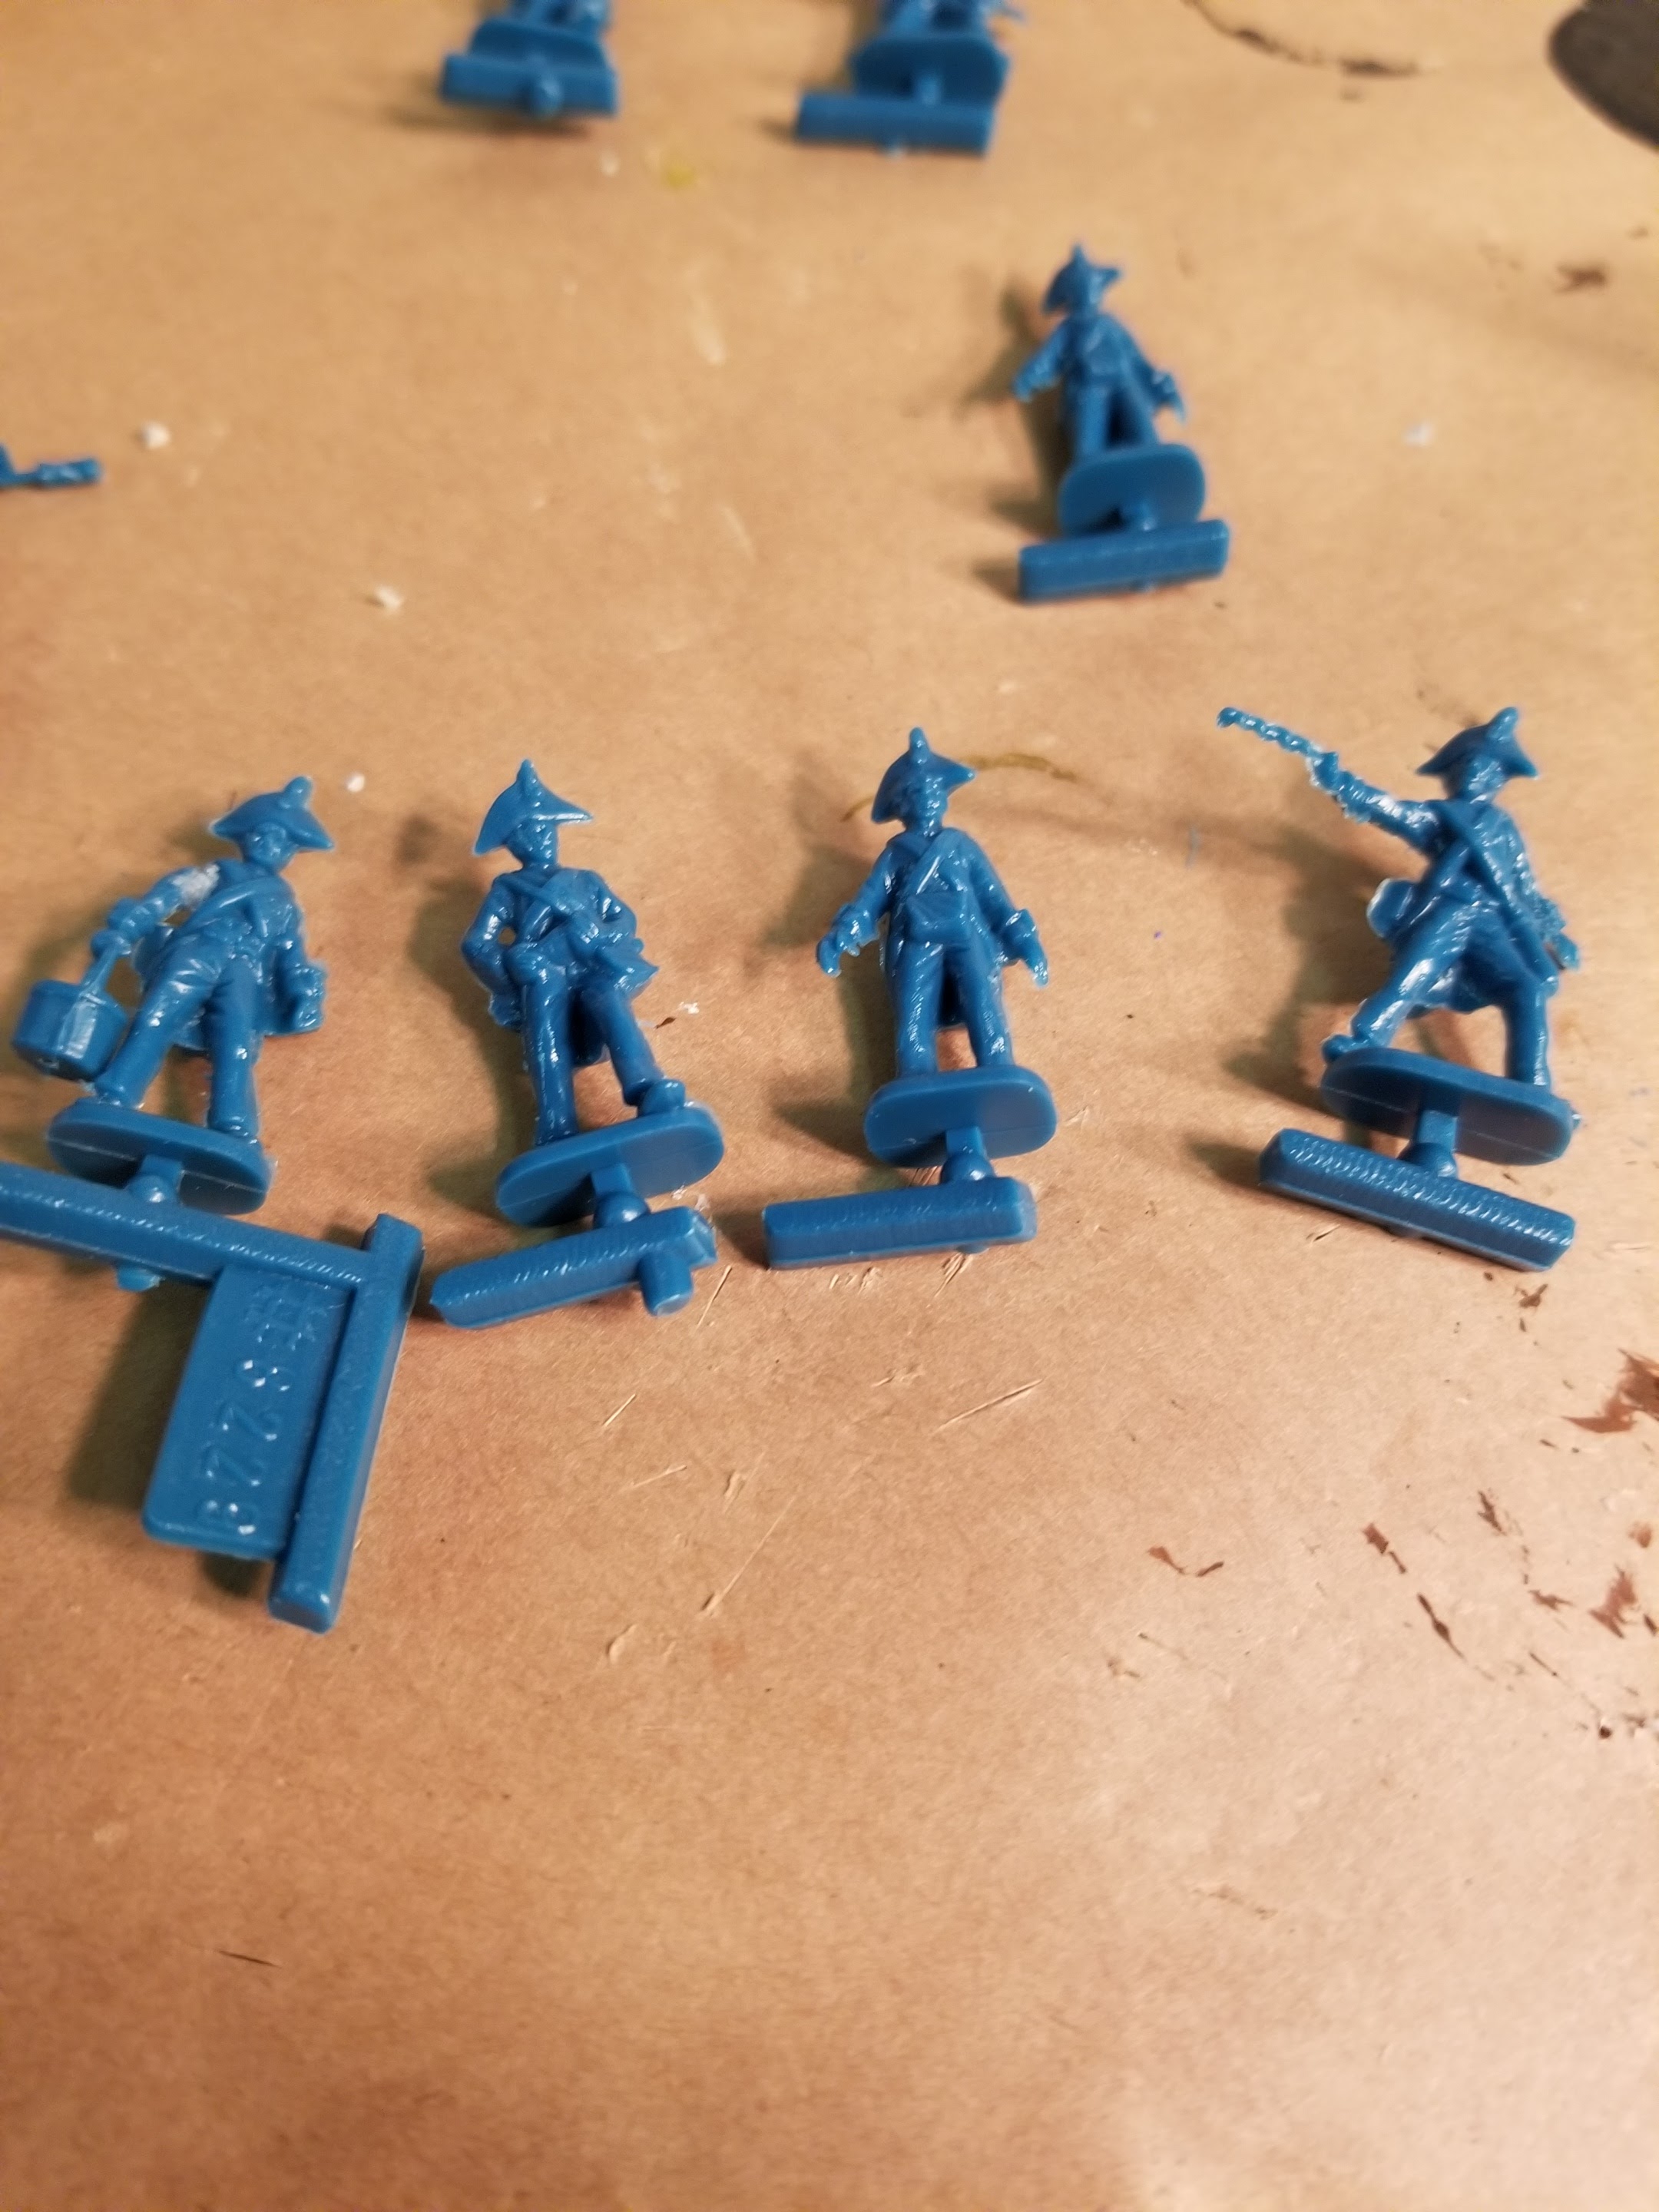
I am finishing painting up the last of the infantry.  I am now starting on assembling the artillery as I ase the infantry and wait for the glue to dry.


I like the packaging. The figures are sculpted very well and there is some excess flash to remove. The soft plastic cuts easy so you need to be very careful removing any excess. On figure requires assembly to add variety to each gun crew. 


There are 4 canons to assemble, and they are a little tricky. The best way for me to build them is to glue half of each liber with the center support and let them dry, then glue on the other side of the limber, followed by the axle, wheels and barrel.  I did notice these are really large guns. The wheels are almost head high to the figures. 


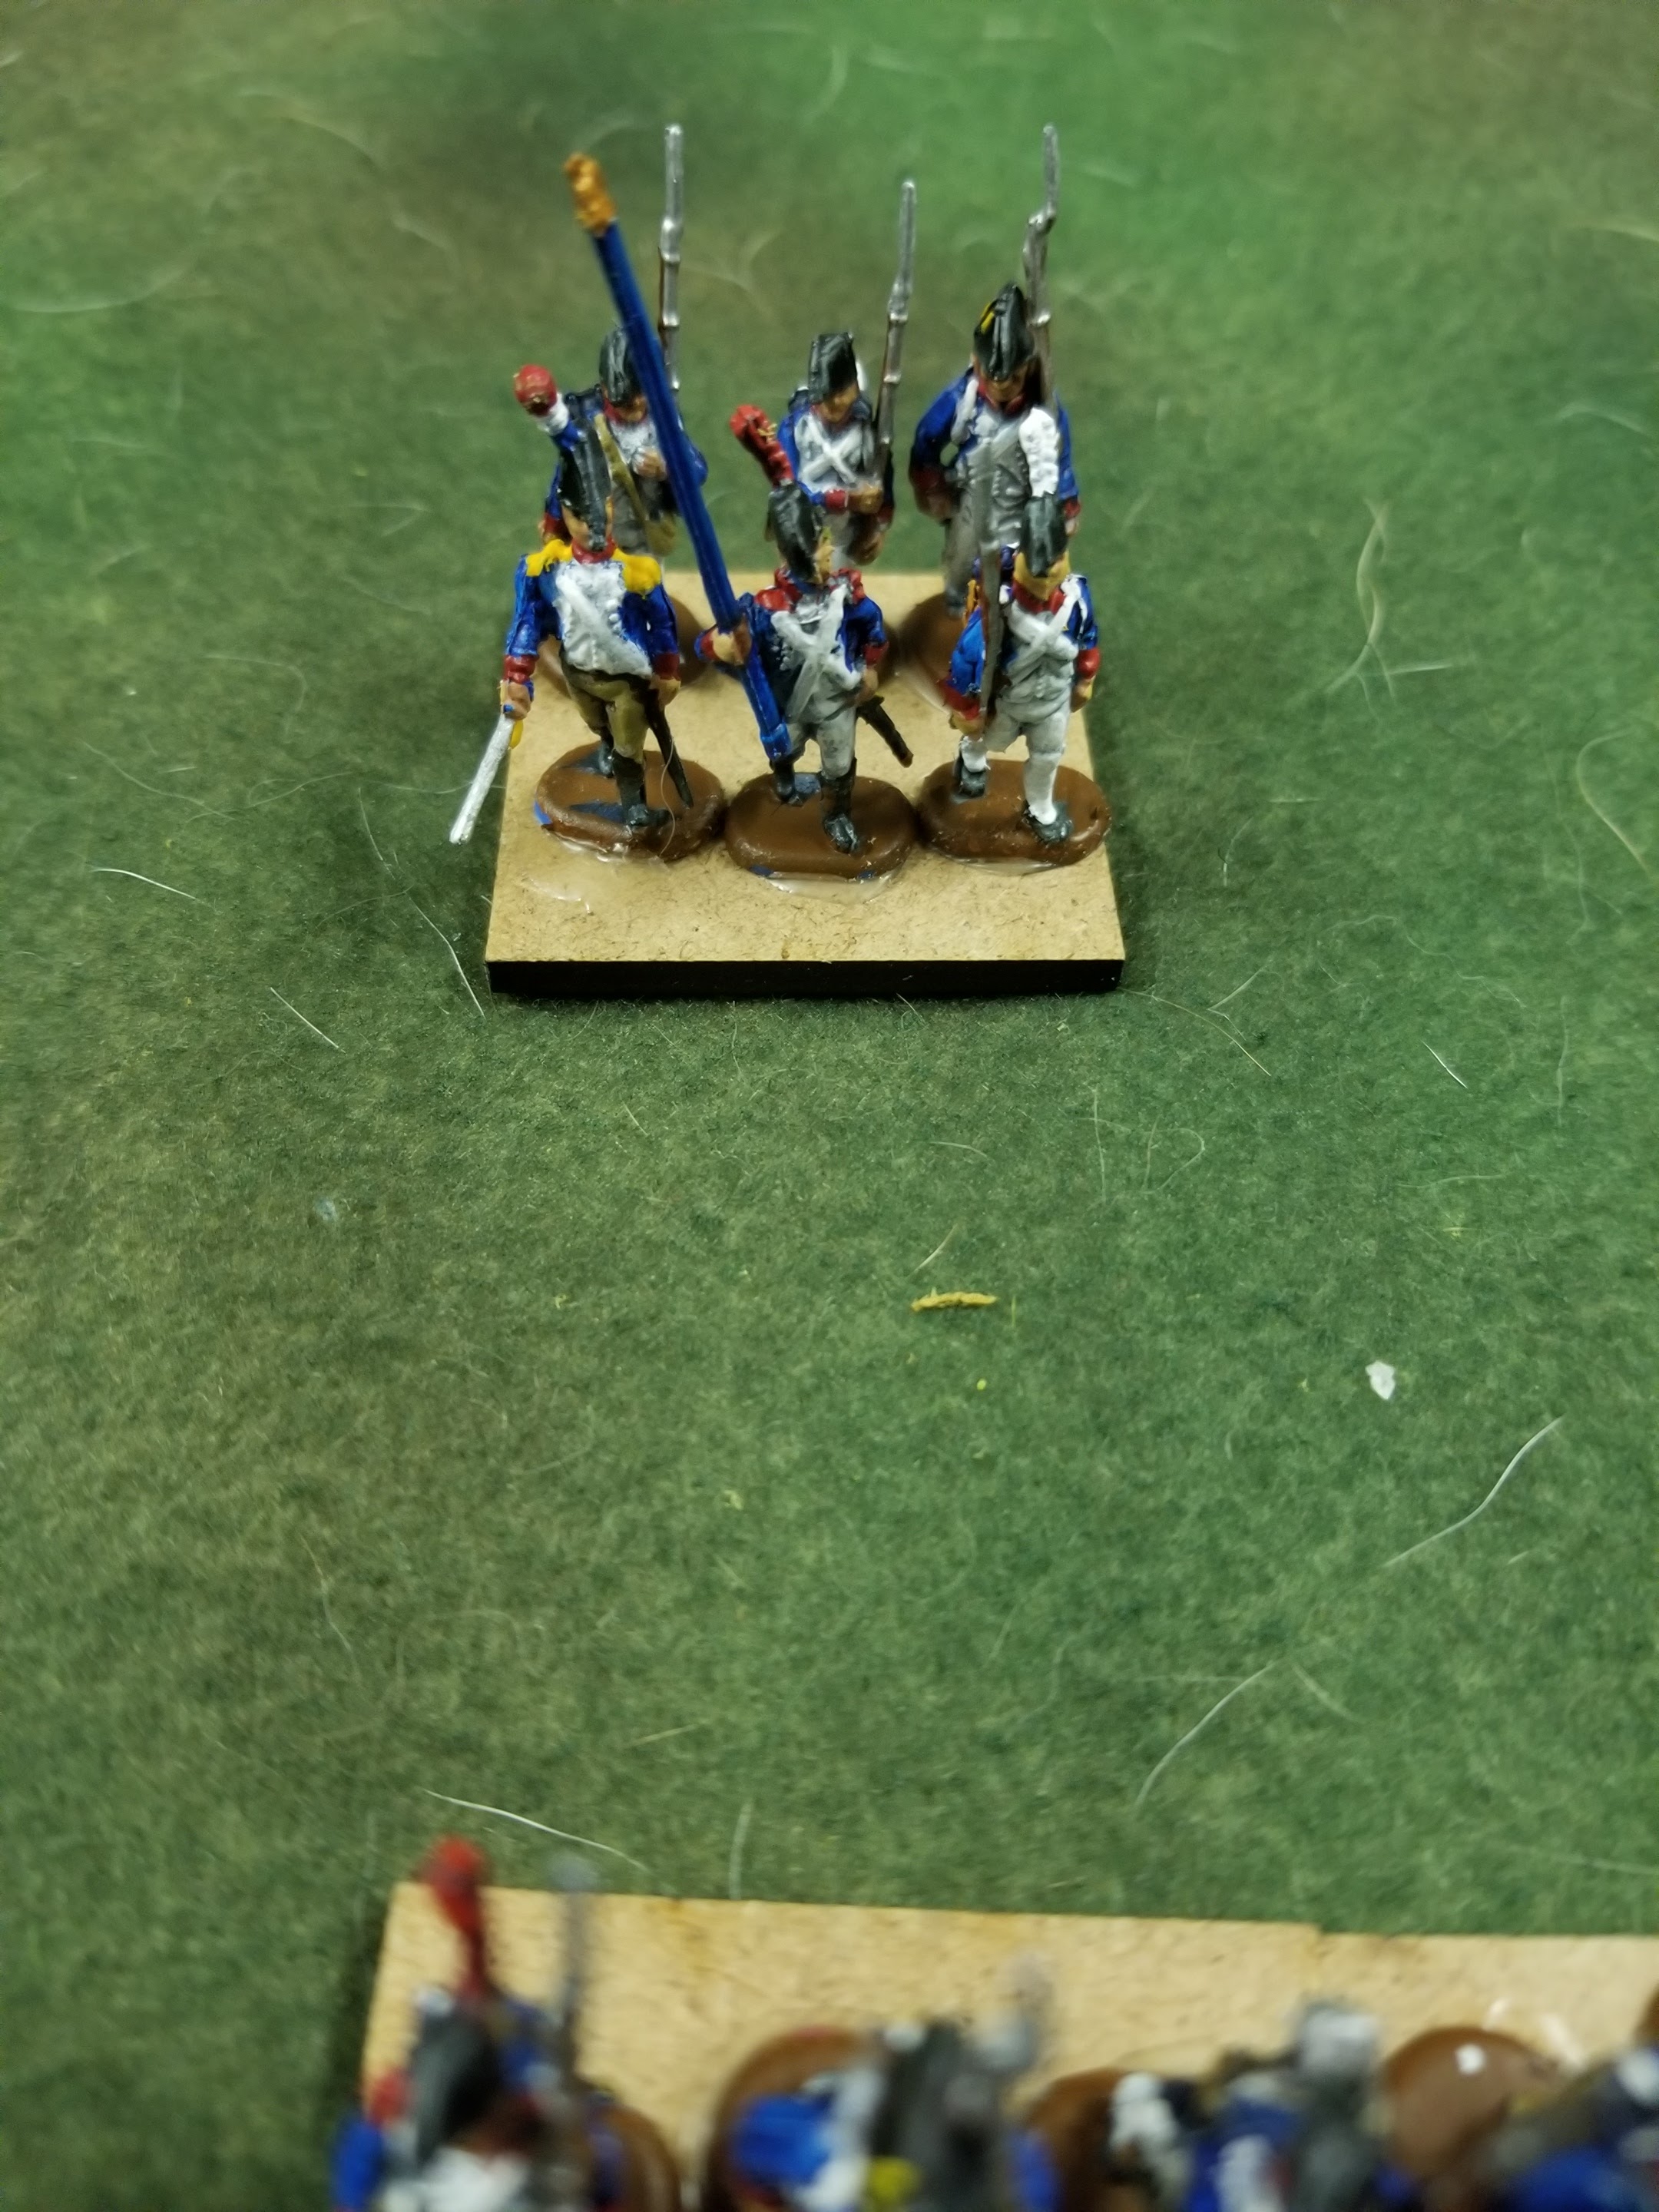
I painted the Infantry figures and am selecting the marching poses to build the first unit.  I mounted them on 40mm x40mm bases and have a 24-figure unit completed and two command bases done to start 2 more units. I placed another order for 2 command boxes and a box of French in overcoats.  The overcoat figures will have less detail to paint and help speed up the completion of units. I decided to leave the eagles attached to the standards, they are a small detail, so they aren't too noticeable. 


I definitely prefer the gray primer over the white. Dry brushing white over gray looks much better. The bases are 3mm thick and cost $18 for 100. 


I will hold off placing the other marching figures on bases as I want to mix those wearing the overcoats with other figures not wearing them. The Demi brigades were campaigning hard, and I wanted to give a less conforming appearance.  


I will be keeping track of total costs and will post a sheet later. This project will take a long time, I feel better about using the less expensive 1/72 figures now that inflation and gas prices are hurting my wallet and my 401K is tanking, Besides I like collecting them. 

Figure Cost

HaT 8297 French Command Box   $6.99

HaT 8296 Early French Marching $6.99

HaT 8062 French Line 1805.           $8.99

HaT 8229 French Artillery 1805.   $8.99

40mm x 40mm bases x 100           $18.50

Project cost to date.                         $61.86

Monday, June 13, 2022

Early French Batch 1 from HaT


I received the Speedpaints and started on the figures. I used Highlord Blue which works great with a white undercoat. 


The White Speedpaint isn't necessary with the gray primer and white dry brush. I am using white primer on the next batch to see which method is better. 


From my count I completed:
28 Marching 
9 Command figures (Standard bearer, drummer, officers, Sapper)
14 Advancing pose figures
3 Firing figures
8 Loading Figures


The Plastic Weld does work for assembly, but takes 30 minutes to cure. The figures will come apart if moved so using PVA to hold pieces together is still required but it is less messy than Super glue which dries in a hard brittle crust. 


Saturday, October 27, 2012

Indian Mutiny

Rules: Black Powder
Scale: 28mm
GM: Jim Ferich

The Indian mutineers are trying to stop a column of British troops from exiting the the board to continue their relief efforts. The rebels have amassed an impressive force to meet the British. They construct a fortification on the raod and deploy to defend their position. The 4 units of cavalry are deployed to the far right flank of the mutineers. Infantry and artillery deploy along the road while peasants emerge from a town on the far left. Most of the leadership of the mutineers is 7 and the peasants are a 5.


Peasant mobs emerge....poor leadership will keep them static.


Mutineers hold the center


The fortifications block the road and more mutineers arrive


The mutineer cavalry
  The British set up off table. Soon the skirling of pipes is heard coming down the road. Then the ground shakes as the thunderous advance of British cavalry is felt. The cavalry rolls extemely well with 3 moves. This takes them far ahead to meet the mutineer cavalry in turn 1 and set up a melee very early in the game. Another good roll brings Sikh and loyal Sepoy infantry to within rifle range. Sadly the British main force blunders and marches left. The pipers must have taken the wrong road during their confident advance which delayed the attack another turn.


Some British forces move fast and prepare to engage on turn 1
 The British and allied cavalry make quick work of the fragile mutineer units. The British cavalry wins the initial combat and is eligible for a sweeping advance. A second mutineer cavalry unit is caught in column and quickly destroyed on the continuing combat round. Mutineer cavalry had a good morale but given a poor stamina of 2.


2 mutineer cavalry units are disordered and 1 is shaken (blue chip)

The British left keeps pace with the advance
 With the destruction of the mutineer cavalry the Britsh horse sweeps around the flank and approaches the road. Mutineer infantry units are dispatched to guard the flank. These British trained Indians form square to block the approach. British guns are brought up with the cavalry to make a hole. The cavalry is kept at bay by the infantry square through the game. Eventually the cannon fire will break the infantry square at the end of the game.


Oh crap
 The British right flank blundered a second time which again delayed the attack. The British left flank moves to the center to attack the fortifications. The club record for blunders in a single game belongs to me, which is 3. This night the record was to be tested by another valiant opponent.


Mutineers block the way

The main road with the British center making it to the board edge after several blunders

 Then the Highlanders in the center finally arrive to pressure the center of the field. Cheers go up from the mutineers as 3 units of Sepoys arrive on the left flank to put the battle in doubt. This bolsters the defenders spirits after seeing the cavalry swept from the field so quickly by Loyalist Indians and British.


3 units of Mutineer reinforcements arrive.
  With a poor roll of initiative the left flank  British infantry fail to move. The Highlanders gain a good result and get 3 moves. The aggressive Scots take cannon and musket fire and several of their number fall. Finally they reach the defenders when they emerge from the torrent of fire in a disordered state.
A melee ensues and the result is a draw. The Mutineers have support and the Highlanders do not.


Highlanders arrive in a disordered state
  The rest of the British units slowly navigate the field with little or no movement. British canons supporting the attack are in medium range and open fire with some effect.

The British Infantry is stalled for now
  In a daring move a unit of mutineers exposes their flank to british artillery and advances on the Highlanders. The flank attack will help pressure the stubborn Scots to rethink their attack plans but it does sacrifice the unit of Sepoys in the process. In a stunning result the highlanders are finally repulsed and forced back in disorder after taking a high number of hits from several directions.


The Scots retire in disorder after being flanked


Supporting troops are now close as another assault is planned. Once more into the breech.
  Finally the Naval Brigade moves into position with supporting artillery. The Mutineer unit of Sepoys that flanked the Scots is destroyed. The steady Scots continue to take casualties as the assault is prepared. The slow advance by rolling poorly causes casualties on the British. At this point the British commander in the center had accumulated 3 blunders which equalled my record in a previous Civil War game.


Jack Tar at the ready!
  Rifle and canon fire are exchanged in an attempt to soften each other for hand to hand. We all know what is coming as we try to dish out more than we take.


Mutineers face off against the coming storm.
  The British infantry finally gains intitative to advance on the fortified position. The Mutineers become desperate. Soon the defenders on the road are broken after taking high casualties from accurate fire. More British advance to support and the supporting artillery makes the difference.


Every rifle is brought to bear  on the attackers
  The British announce the charge. Bugles sound and men scream and run forward. The highlanders work on eliminating the supporting infatry outside of the fortification in an attempt to even the odds. Another mutineer unit is shaken as the Scots pour fire into their ranks. In a streak of luch for the rebels the Highlander unit is also shaken and rolls poorly on their break test, they are finally broken and flee the field!


The assault on the fortifications


The assault on the fortification sans Scots
  The melee in the fortification goes poorly for the mutineers as the center is now broken. The British forces rush into the fortification and open the road. The game is then called.


The final result is the taking of the fortifications.

The game took three and a half hours. We did need to look up a few rules but overall we played without being slowed down be tedious rules. We did have some problem deciding how to treat fortifications, which will be considered as occupying buildings in the future.


Monday, May 14, 2012

Forney's Fields - Gettysburg


The scenario is taken from Enduring Valor - Gettysburg in Miniature by Scott Mingus. This book is a fantastic resource for anyone interested in the 3 day battle at Gettysburg. The game is set to last 8 turns.


On July 1, 1863 at Gettysburg Pennsylvania elements of Doubleday's I Corps clashed with elements of Rode's II Corps along the Mummasburg Road just northwest of the town. In this battle General Ewell ordered Rode's division to break the right flank of the Union's I Corps that was held by General Robinson's 2nd Division. In our game Iverson's brigade leads the attack in the center of the board with Daniel's brigade on the Confederate right flank and O'Neal on the left flank. In the historic battle this was a piecemeal attack by the Confederates so leadership and special rules were assigned by game master Chris .


Confederate Set Up:


Iverson's Brigade

Center: General Alfred Iverson Leadership Rating of 7
OOB: 5 NC, 12 NC, 20 NC, 23 NC  All veteran rifles

General Iverson will move across the field under fire and assault the Union left position since General Daniel's leadership rating is suspect due to thack of command and control as per the scenario.

Daniel's Brigade

Right: General Daniel Leadership Rating 6 - troops in column do not get the free move while in column
OOB:  32 NC, 43 NC, 45 NC, 53 NC 2NC Btn
General Daniel is ordered to support Iverson's assault on the union left. It's really 50/50 for each activation attempt.

Left: General O'Neal  Leadership rating 6 - troops in column do not get the free move while in column.
OOB: 3 AL, 5 AL, 6 AL, 12 AL, 26 AL and Robinson's Sharpshooters. General O'Neal sets up off the table.

Note that there is no overall Confederate commander as the Division Commander Rodes was not present at this part of the battle. This proves crucial in command control and explains the uncoordinated piecemeal attack by the Confederates. The scenario states that the brigades of O'Neal and Daniel were to support Iverson and there was a lot of uncertainty on the field.

Union Forces Set Up:


Baxter's Brigade

Union Right: General Henry Baxter
OOB: 12 MA, 83 NY, 97 NY, 11 PA, 88 PA, 90 PA
General Baxter is holding a hill and is facing threats from the north and west.

Cutler's Brigade

Union Left: General Lysander Cutler
OOB: 76 NY, 95 NY, 147 NY
 Cutler is holding the northern tip of McPhereson Woods and are given hidden set up. This area must be taken by Generals Iverson and Daniel.

Arriving Turn 4: Gabriel Paul
OOB: 94 NY, 104 NY, 107 PA, 16 ME and 13 MA
General Paul has not arrived and is not on the table.

The confederates are given the initiative since the Union is in a defensive popsition.

In the opening move Iverson moves his brigade across the Union center in an attempt to take the woods. The Union's lack of artillery helps the Confederates move quickly. The Confederates are slowed by the many fence lines and lose 6" of movement at each obstacle. The Union forces in the woods hold fire and remain hidden. In the actual battle the union held fire until the Confederates closed to within 80 yards.


 O'Neal fails to move and does not enter. The Union infantry waits patiently on the hill top. A unit of Robinson's Sharpshooters is alread deployed and fires with a disorder result. The union forces return fire with no effect.


In the second turn the Confederates plodded along in the center as Iverson rolls successfully as does O'Neal. The Confederate troops on the left finally begin to arrive! Now the Union forces rise up and deliver a crushing volley. Iverson's leading unit is hit 3 times and the result is no saves. The unit is shaken and the Union Generals rejoice in their fortuitous turn of events. The emotional rollercoaster begins early for both sides. Then the union center opens fire causing a disorder result on a supporting rebel unit. The attack in the center appears to stall for Iverson.


During the second turn the Union right scores a disorder result on the Sharpshooters who have been harrasing them. They finally see the approaching rebel units who are hell bent on taking the hill. The Union players stays on the hill and knows he has a great defensive position. There is no need to rush down and attack. They again exchange fire and disorder the sharpshooters.


The Confederate right flank under General Danial has still not moved. Rolling a 6 or less is very difficult indeed. This is where I miss having the +1 bonus for being in column. Remeber we took it away to keep the conditions true to the battle and reflect the peicemeal assault. Oh the pain...oh the agony!


On turn 3 I roll very well and Iverson gets 3 impetus. I moved the supporting units up to firing positions and deploy in line. Iverson's men shoot well but the Union defenders shrug off the hits. a disorder result is achieved and I hope to keep the Union force pinned down. The remaining 3 units take position as General Daniel conitnues to move to the extreme flank....go man go!
Having the disorder result really hurt the attack. The brigage loses that extra punchneeded to drive the enemy from the field. This was a bad position to be pinned down as the enfilading fire really takes its toll over the next few turns. I moved a bit too close to the center.

General O'Neal moves boldly along the left flank pressing the Union right. The sharshooters provide a skirmish screen so the assault can hit with the full force as intended. The Union forces begin to move aggressively and drive the sharpshooters away. Turn 3 ends with Oneal ready to assault the hill.


A second unit of Iverson's is broken


The Union right flank is in disorder with one shaken unit


General Iverson rolls for 2 impetus for the next turn and moves quickly to the woods. He is just short of engaging in melee. The union forces under Cutler respond with lead and disorder the assaulting units and inflict 3 hits resulting in another shaken Confederate unit. At this point Iverson's brigade is almost broken. Thank goodness I rolled well at each time a unit was shaken and kept the force on the field. Now that 2 units out of 5 are shaken the brigade is almost forced to retire. O'neal has better luck and causes multiple disorders and gets a shaken result on a Union infantry unit. The assault continues.

Iverson finally makes an effort to assault on the following turn, there were a lot of fences to be crossed. The Union unit under Cutler is shaken and disdordered. The Yankee forces stay put and try to hold the key position. The shaken unit is forced to retire on the poor result from the ensuing dice roll. Hopefully enough units can follow up and hit the flank even harder. It's anybody's game at this point.


On the Confederate left the Union exchanges fire as the opponents slug it out. O'Neal's forces try to soften the resistance on the hill but Baxter does not give an inch. The Confederates keep up the pressure hoping the Yankees buckle. It's all hand-tohand if  O'Neal wants to take the position. Cold Steel will rule the day.


The Union center is resolute in holding their position. A formidable position for sure. In the actual battle Iverson advanced on this position losing 900 of his 1400 men. Would it be suicide to do the same?


"Uh Oh", as quoted by me on turn 5

The Union reinforcements begin to arrive as they gain impetus to finally enter. They missed out on turn 4 due to a high command roll.


On turn 6 General Iverson's forces finally take the woods. The Union brigade is now in trouble as several units are shaken. The brigade holds ground in the resulting roll. Cutler's brigade takes up defensive positions on the ridge next to the woods. A sole unit remains in the woods giving th Union some hope in reclaiming or at least contesting the position. We decideed that the Union infantry was in defensible terrain allowing it to stay. Off in the distance a steady drum beat can be heard over the musket fire and screams of dying men. Reinfocements have arrived. 

Now the Union reinforcements are moving up fast as General Paul from Wadsworth's Division of I Corps closes in on the fray. The strategy of General Iverson is changing from assault to defense and he must now hold what has been won. He knows he must must give the rebels a chance at winning or at the very least a respectable draw by keeping a grip on McPhereson's woods. On turn 6 General Daniel finally advances to support Iverson, but there isn't much left of Iverson's brigade left to support. Danile's brigade moves into firing range and deploys in line. 

On the left flank General O'Neal has his hands full. The disorder results from Union firing slow the advance. A unit manages to advance in the extreme flank and tries to break through. If they succeed the flank can be turned and the Confederacy will carry the battle.


O'Neal begins the assault on turn 6

Fighting along the road...hand to hand.

The sole unit from Iverson's brigade holds on and Daniel moves in support. General Paul's blue bellies are advancing in column. A fight for the woods is about to take place if they can reach each other before turn 8.

Gen. Daniel reaches the wood...and Paul is closing in as well


 On the final turn the Union column close in but fail to change to line. The woods are contested but Gen. Paul is caught in a precarious position. The union has the added benefit of command and control as the Division commanders can issue orders when the brigadiers fail to do so.

Gen. O'Neal is repulsed in the final turns of the game. On turn 7 the brigade got in trouble and on turn 8 they were driven back. The battle on this flank could have gone either way but the dice gods favored Billy Yank.

O'Neal is driven back.
The game of 8 turns lasted 2 hours and the game was very close. In the actual battle Gen. Iverson failed and was accused of cowardice and being drunk. The Union also carried the battle until Gen. Ramseur advanced in support of Rodes and drove back the elements of I & II Corps on the first day.

Well another successful game of Black Powder. Until next time.


Saturday, February 4, 2012

Black Powder - French and British - Salamanca


Rules: Black Powder
Figures: Perry, Old Glory, Victrix
Table size: 6' x 10'

Two gamers visited from Baltimore and wanted to test play a game that they will run at Adepticon which will be held in Chicago in April; where I am sure the historical players will meet the warm embrace of the 40K players.  There were 4 French players and 3 British. The hypothetical scenario takes place near the battle of Salamanca. In the historical version the French and British lined up, stared at one another for the better part of the day and left the field as the Battle of Salamanca took place nearby. As war gamers we know this is not a fun night so we played out the battle as it may have happened. The goal is to hold the road and the church where the British 95th rifles have already deployed.

The British set up on the left, the French on the right
The British prefer line and have the ability of first fire. The British Guard units are elite so they can remove a disorder result. The command rating means they can execute orders on a result of 8 or less on 2D6. Highlanders, dragoons and hussars are also present. I believe there are 5 brigades so the French will need to break 3 of them to take the field.

British forces will advance in depth
The French are deployed on the opposite hill. There are 5 brigades as well and there are no elite units. The French center commander  is Foy and he has been given a rating of 9, better than the average rating of 8!


The French deploy ..the thin blue line?

An indication of how my night was about to go was revealed on the opening move as I roll a 12 when giving command. MERDE!!! Now we know the game could possibly end on turn 1 if I leave the board, so I am allowed to re roll my command dice.  I get one move as the brigade moves forward, the cavalry outpace the infantry with their 18" of movement.  The French right flank, shown below, advances off of the hill and deploys. The French left flank get 3 moves and advances to the church and is able to melee with the 95th rifles on turn 1! It is apparent that I am the slacker for the French.

French right wing advances and the British move to meet them
The French right successfully kick out the British rifles from the church. The 95th loses and leaves the field! Things look promising for the French as one of the objectives is in our control. The British move off the hill on turn 1 and fire casing 3 casualties which yields a shaken French unit. I send the Army commander to the town to rally the unit and remove a casualty on turn 2.  The shaken result is removed!
The French take the church and the British try to get it back
Uh Oh, the British Guards advance confidently against the center and move within 12" of the French. The guards have a stamina of 4 and will be hard to beat. We exchange fire over the next turn. I used an initiative move to change into attack column. I sacrifice fire power for a better chance to receive orders for a +1 command rating.

The Guards advance
The French right wing moves to the road and gets cavalry support from Lancers, dragoons and hussars.
The position gets full of units positioning at the end of turn 2.

Dragoons in the Center and the French right in the distance
The French left holds the position as the British move in with another rifle unit..the 60th I believe. The exchange of fire goes against the rifles as the French enjoy a defensive terrain bonus. Cold steel will be needed tby the British to take the position.

The French left holding the church
The British Guards hit the center. The French lose a unit on the left and the unit on the right holds but is badly mauled. I am forced to move the dragoons to support but that did not help my cause. In the next turn I roll a 4 and the second unit leaves the field. The center is wide open for the British. Basically I rolled very badly and Eric, the British player rolled very well. I did score 5 hits on one unit in melee, but he saved them all. MERDE!!!
The British Guards hit the center!

The French fair better on the right flank. On turn 3 they lose an infantry unit but push back the Brits on the far left. The battle ebbs and flows on turns 3 and 4.

The French right are holding..but the center melts away!
The British Guards are relentless in their pursuit. The hold on turn 5 and open fire causing another shaken unit on the French Center. The French center brigade is now past 50% and will leave next turn. The French don't seem to understand the concept of rolling 4,5, and 6 during combat or saving throws.

The British Guards rolling up the center
The French center is almost gone.
The British are forming squares as the French cavalry makes itself known on the right flank. British units become shaken but hold the line. The French pure their fire into the dense square formations.
The British left begins to crack

 The positions on the French right and British left become confused and congested. Units fall upon one another. You can almost hear the screams, musketry, and horses  whirling about the field.  I honestly don't know what happened or who  was winning at this point.

British left pull back as one brigade breaks but the center reinforces!
 The French commander returned to the center to support the shaken troops. It was too late as the French were beaten in melee and never had a chance to recover. A unit of dragoons and infantry are left, the artillery does not count for morale purposes. The brigade is effectively destroyed and leaves. The British continue to close in the next two pictures.
Where the French infantry?

 The French right eventually gathers itself for one more attack. The British and French give and take on turn 5. This will determine the game.

 The French take more than they give and are forced to leave. The red chips indicate shaken units. The white chips show disordered units.
The French right is shaken and disordered...the force has lost too many brigades and leaves the field
The game lasted about 3 1/2 hours. This was a very large battle for our club and will be popular at Adepticon. We determine that the out come was a marginal British victory. The French held the church but lost the road. The British did lose a brigade and the 95th rifles so it is a somber victory. The French return to their camps and learn about the results of Salamanca that day.

The next game is scheduled for Friday February 10th and will be a playtest for Cold Wars. We are running a Boxer Rebellion game and the rules will be Colonial Adventures modified for the era.